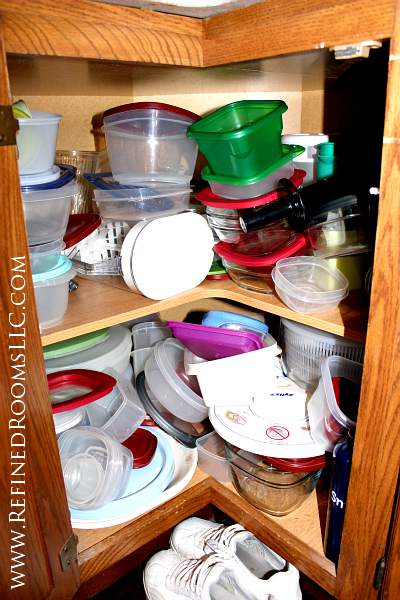
Today it’s all about organizing plastic ware. Oh yes. I’m going there. One of the most common scenarios I come across as a professional organizer is the cabinet/drawer filled with untamed plastic ware.
Raise your hand if you have one of these:
I’m not sure what is behind our obsession to hold onto every plastic container that we’ve ever come in contact with, but I’m here to tell you that EPWS (Excessive Plastic Ware Syndrome) is an all-too-common problem in our homes. If I had to offer just one piece of advice on the subject, it would be this:
Keep only the required number of containers that you need to store one week’s worth of leftovers.
Since EPWS is such a common challenge in kitchen organization, I’ve developed 2 foolproof methods for tackling this problem in clients’ homes. Method 1 is to simply recycle all of the existing collection of plastic ware and invest in a new set (can you say instant gratification?). Method 2 is the less-expensive, but more time-consuming choice, and the one that I’m sharing with you today.

1. REMOVE ALL CONTAINERS FROM THE STORAGE AREA
As in any organizing project, clearing out the space to be organized is the first step in the process. As we began to tackle this space, the client stated that this was the first time in over 25 years that this cabinet had been emptied!
2. TOSS CONTAINERS THAT ARE ORPHANS, DAMAGED, “MYSTERY” & “UNI-TASK”
Once the entire contents of the cabinet are sprawled out over a large flat surface, begin to match lids with containers. Look for lids that don’t fit any containers, and for containers without lids (i.e., Orphans).
You may come across containers that are cracked, cloudy, and/or scratched. These damaged containers should be recycled or repurposed for a function other than food storage, since damaged containers may enable harmful chemicals from the plastic to leech into food. Orphan containers can also be repurposed for containing small household items, or you can choose to recycle them.

I also recommend that you get rid of any container that is not clear (i.e., “Mystery Containers”). Too often, the leftovers contained in the recycled Country Crock container go uneaten because people mistakenly assume that there’s butter and not leftovers in this container. You greatly increase the likelihood of consuming your leftovers if they are able to be seen in clear containers.
As we examined the contents of my client’s cupboard, we chuckled when we came across some vintage containers. One was made specifically for storing a Velveeta cheese log, and the other was shaped like a piece of pie. Specialized “uni-task” containers such as these should be recycled, since you can just as easily store your Velveeta or pie slice in a plain rectangular container.
3. SORT LIKE A PRO
The next step in the organizing process is to sort the containers by size. Ultimately, your plastic ware collection should contain a variety of sizes to suit your food containment needs. Once you sort by small, medium, and large sizes, it’s easy to see where you may need to whittle down your current collection.

In the case of this particular client, she had only a couple of large size containers, but she had an excessive number of medium-size containers. We decided upon a reasonable number to keep for each size of container, selected the best of each category, and set the remaining containers aside to be repurposed.
4. CONTAINERIZE YOUR CONTAINERS
Once you have culled through the collection and have determined the “keepers”, the final step in the process is to determine how best to store your plastic ware. For this particular client, we decided to store the small, medium, and large containers separately in larger plastic bins (nested as much as possible to maximize space), along with the matching lids.
Depending on the number of containers in the collection, and the size/configuration of the drawer or cabinet that will house the collection, I have also set up systems in which containers are stored together in a nested fashion, with lids stored separately in a bin.
5. PLACE YOUR CONTAINERS BACK IN THE STORAGE AREA
This client’s plastic ware was located in a deep, lower corner cabinet. Now, when she needs to access her food storage containers, she simply grabs the appropriate bin (which is clearly labeled) and retrieves a container/lid that will accommodate that evening’s leftovers.

After the plastic ware was sorted, purged, and organized, there was plenty of room in the cabinet for additional small appliances, and a “baking kit” that we created during the kitchen organizing process. Since items tend to get lost in the far back area of deep corner cabinets, we placed labels inside the kitchen shelves to remind the client what was being stored in those areas.
Voila, EPWS no more!
Looking for more kitchen organization tips? Be sure to check out these posts:
Photo credit: Image © Depositphotos.com /design56
- Printables for Organizing Home & Life: The ULTIMATE Organizing Printables Vault! - November 28, 2023
- Clipboard Wall Organization for Papers: Easy DIY Paper Storage! - September 4, 2023
- How to Plan a Graduation Party to Remember: The Ultimate Graduation Party Planner - May 9, 2023


Tammy says
my husband is a trucker and we need more than the average person. when I go with we have lots of produce and organization that we do for our small semi fridge. if I don’t go he can easily take a majority of our Tupperware. I throw a lot out because as you know there is no running water in a semi. in addition I’m disabled and today I may be able to cook but then be down for a few days so storing leftovers is important. I’m finding it hard to keep organized when he just throws them in the cupboard but then gets angry when he can’t find what he needs. in addition to mobility issues I’m looking for a helpful way to store these items. we also keep old sour cream/ butter dishes because they seem to be a better fit for items like soups and it’s easier to toss those when he doesn’t get them cleaned out on the road.
Braden Bills says
I want to make sure that I’m able to store all of my things properly. It makes sense that I would getting a plastic storage bins would be beneficial. I’ll make sure that I have ways to organize them properly. That way, I don’t have to worry about losing them.