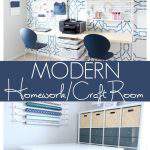
Drumroll please – the spare bedroom makeover reveal post has arrived!
With the writing of this post, I’m proud to say that I’m wrapping up my first adventure as a One Room Challenge™ participant. And what a ride it has been.
Spare Room Makeover: The Reveal
Remember what the view upon entering the spare room looked like when we embarked on this ORC journey seven weeks ago?

It looks a wee bit better now:
Think that’s a dramatic change? Feast your eyes on this one:
FOCAL WALL – BEFORE
FOCAL WALL – AFTER
Let’s dig into the craft zone first.
Craft Room Tour
This post contains affiliate links for your shopping convenience (which means if you make a purchase after clicking a link I will earn a small commission. Click here to read my full disclosure policy.
As you can see, all of my craft storage wishes have come true. With the addition of this fabulous IKEA Kallax cube storage system, we have more than enough room to relocate all of the craft stashes from around the house to this central storage mecca.
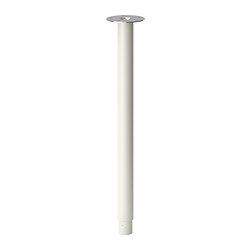
And no more DIY projects at my dining room table or wrapping gifts on the guest room bed. This new IKEA craft table with adjustable legs provides a huge, dreamy flat surface on which to do All The Crafty Things.
You may recall from the design plan and my craft room configuration update post that we had originally intended to connect the table tops to the storage cube system. That plan changed pretty quickly when I realized that it would be next to impossible to access the items located in the far left storage cubes (heh heh. I told you I was spacially challenged).
So I ordered a second set of IKEA Olov table legs in order to create a set of freestanding tables. This makes so much more sense, as it gives me the option to vary the configuration of the room as needed, depending on the project I’m working on.
Since we’re now storing gift wrap in the craft zone with the help of our handy dandy gift wrap storage solution, it only made sense to relocate gift wrap ribbon from the closet to the adjacent Kallax storage unit.
I went back and forth on whether to invest the extra money in these Kallax drawer inserts. Let me just say that it was the best decision I made in this room makeover.
These drawers serve as the storage workhorse of the craft zone, providing the perfect spot for all of my scrapbooking supplies (that formerly lived in my hubby’s office.)
Of course, my kiddos have their fair share of crafting supplies that were lurking all over the house. Now they too have the perfect home.
Did I mention how the teal-grey high gloss finish of those drawers makes my heart go pitter patter?
And every time I catch a glimpse of this wall, I find myself itching to start the holiday gift wrapping extravaganza! This DIY gift wrap organizer is not only functional, it serves double duty as wall art by providing a golden opportunity to add fun pops of color.
Above the storage cubes, I created an informal gallery wall using a mix of store-bought framed prints, free printables I discovered on Pinterest, and one that I DIYed myself.
I happened to have this extra IKEA Mosslanda picture ledge on hand, which I used to pull it all together.
Here’s the printable that I created using Canva:
Because homework can sometimes be a drag, I wanted to fill the space with inspirational quotes that conjure up good vibes and happy thoughts whenever the kiddos are working at their homework stations.
Speaking of homework, let’s leave the craft room zone for a bit and stroll on over to the new homework station.
Homework Station Tour
In this photo, you can catch a glimpse of the new light fixture, as well as the area rug that came to my rescue and serves as the perfect camouflage for that little paint disaster that occurred in week 3.
Ever since they first laid eyes on these Elfa utility boards at The Container Store, both of my kiddos begged us to install them on their homework stations. Their wish was my command.
What’s not to love about a vertical storage solution that frees up your desk space from clutter?
The Container Store offers a variety of attachable hooks, shelves, and storage accessories that you can use to customize your utility board to the hilt. And that’s just what we did.
Remember back when I showed you my daughter’s unruly stash of random papers and art work that was living on the floor next to her bed? Well all of those papers finally have a new home here on these shelves:
Each kid has their own set of drawers for storing office supplies and other miscellaneous items (such as my daughter’s GoPro and GoPro accessories).
I created labels using Canva and inserted them into Elfa label holders, which attach to the outside of the drawers. There shouldn’t be any confusion as to whose stuff is whose. Right?!?
What kind of professional organizer would I be if I didn’t subdivide the heck out of those narrow drawers with drawer dividers (one of my Top 10 organizing product picks).
And there’s more inspirational quote art to be had on this side of the room:
This modern clock was another design element that was sourced by my daughter, and I’m truly loving it!
I’ll wrap it up with a few more of my favorite images from the reveal photo shoot:
It’s unbelievable how much this room has evolved in just seven weeks! In case you missed the previous posts in this series, you can catch up on the week-by-week transformation here:
Week One | Week Two | Week Three | Week Four | Week Five | Week Six
Shop The Post
Spare Room Makeover: Sources
PAINT COLORS
1 – Benjamin Moore Mountain Laurel | 2 – Benjamin Moore Gray Owl | 3 – Benjamin Moore VanDeusen Blue
FURNITURE & ACCESSORIES
Click the links below to shop the post:
Spare Room Makeover: Project Tutorials
Click the links below to see related tutorials for all the projects you see in this room:
It feels SO GOOD to cross those last remaining tasks off of the project checklist:
Sell bedSell light fixtureDonate/Sell CD collectionRemove wallpaperPurchase & install new light fixtureRepair & paint wallsApply wall stencilPurchase homework zone wall shelving & desktopsPurchase desk chairs and assemble desk chairsDecide on craft storage/table configuration and purchaseInstall wall shelving/desks for homework zoneBuild craft zone furnitureSource & purchase area rugAssemble IKEA storage boxes & drawersBuild DIY wall-mounted wrapping paper storage solutionInstall picture ledgeAccessorize (clock, storage containers, etc.)Relocate craft items to new space
I hope you love this hybrid modern craft room + homework zone l as much as we do!
If you’re sad that the Challenge is over, don’t fret because there’s much more room makeover goodness for you to drool over!
Grab a beverage, cozy up on the couch and take a look at the amazing transformations by the One Room Challenge featured designers, as well as the other guest participants.
Finally a HUGE thanks to Linda at Calling It Home for hosting the One Room Challenge. We had a blast transforming this space during the spare bedroom makeover process. What a ride!
I’m already dreaming up plans room for yet another room makeover for the Spring version of the One Room Challenge…
Pin It
- Printables for Organizing Home & Life: The ULTIMATE Organizing Printables Vault! - November 28, 2023
- Clipboard Wall Organization for Papers: Easy DIY Paper Storage! - September 4, 2023
- How to Plan a Graduation Party to Remember: The Ultimate Graduation Party Planner - May 9, 2023
Karins Kottage says
WOW this is gorgeous! I love your focal point wall…so fun! I would love to have you join my Centerpiece Wednesday Linky party and share this post with us! https://karinskottage.com/2020/07/welcome-to-centerpiece-wednesday-july-8.html Hope to see you there!
Karin
Natalie Gallagher says
I actually already post there Karin!
Amy says
Great job! My favorite are the wallpaper and artwork. Looks very beachy!
Natalie Gallagher says
Thanks Amy! It’s actually a stencil…so much less expensive than wallpaper
Anita Holland says
What a stunning craft room I would never want to leave.
Natalie Gallagher says
You’re too kind. It’s a super fun space!
Ann says
Your room is both beautiful and functional. Thank you for sharing at Party In Your PJ’s.
Natalie Gallagher says
Thanks so much Ann!
Kathy A says
What a beautiful room. Makes me want to organize a craft room for myself!
Natalie Gallagher says
Ah, thanks Kathy!
Robyn Garner says
I absolutely love your room, have serious envy, it is so fresh and organised looking, I would hide out in there all the time.
Natalie Gallagher says
Ha Ha! Well, my kids got to spend much more time in it than I did. It is such a happy space though!
Rebecca Payne says
Great Job! Thank you for sharing.
Pamela @ DIY Vibes says
Your space is so light, bright and fun!! Love the wall stencil! Pinning for inspiration!!
Natalie Gallagher says
Thanks so much for the compliment Pamela!
Kippi says
Wonderful “new” room. So organized and pretty.
Natalie Gallagher says
Al, thanks! We love it!
Shelley says
Natalie I am loving what you did to your guest room. It looks so organized and well put together. The colours all look so great together. You did such an amazing job! Enjoy?
Natalie Gallagher says
Thanks so much Shelley! We are already enjoying it for sure 🙂
Natalie Gallagher says
Oh Tim, I feel your pain! Although this space was in great shape, the rest of my house looks like a bomb went off…which happens every time we have a big home decorating project! Can’t wait to hop over to your blog to see your reveal!
mary says
This is a dream craft room! I love the storage and tranquil colors used in the space! I pinned this for inspo!
Natalie Gallagher says
Aw, thanks Mary! Yes, I feel like I’m in a dream actually having a space in my home specifically devoted to crafting/DIY projects. It’s a dream come true for sure…