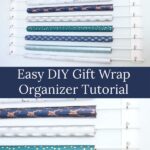
If you’re looking for a solution for gift wrap clutter, look no further! I’m sharing a tutorial for creating my DIY gift wrap storage solution, a super easy but effective solution for storing wrapping paper!
It’s November and I’m entering the home stretch of the One Room Challenge! It’s been quite a ride, but I’m definitely ready to get off this ride and let my kiddos and I enjoy using the space.
If you’ve just stumbled upon my little One Room Challenge mini-series you can take a peek at the room we’re transforming (complete with BEFORE photos) HERE. You can also read all about the design plans HERE.
And here’s the week-by-week progress leading up to the BIG REVEAL in just one week:
Week One | Week Two | Week Three | Week Four | Week Five | Week Six | Week Seven
This week, we tackled the last of the mini-projects for our new hybrid homework/craft room, a fun, easy DIY storage solution for gift wrap!

This post contains affiliate links for your shopping convenience (which means if you make a purchase after clicking a link I will earn a small commission). Click here to read my full disclosure policy.
Everyone has their obsession. For some of my friends, it’s purses. For others, it’s shoes. Not me.
Hi. My name is Natalie an I’m addicted to pretty gift wrap.
I’m not exactly sure what the attraction is, but I’ve always been obsessed with gift wrap. And I have a fairly extensive collection that I used to store under the guest room bed.
But once we made the decision that the guest room would be a guest room no more, I wrestled with the question of where to store my gift wrap.
And then one day it dawned on me – heed my own advice and take advantage of the vertical space in the new craft zone! So the decision was made to store gift wrap on some sort of wall-mounted storage system.
(this blank wall was begging to become a gift wrap storage area!)
DIY Gift Wrap Storage Tutorial
MATERIALS NEEDED:
- 3 1/4″ pine board – the length of the board you will need depends on the desired size of the two wood anchor pieces –we purchased an 8′ pine baseboard moulding and cut it to create two 40″long anchor pieces
- Robe hooks – we purchased a total of 18 hooks to hang 9 dowel rods
- 3/4″ x 48″ dowel rods
- Spray paint (I used Valspar Project Perfect Paint + Primer)
- Wall anchors
STEPS:
First, we painted the anchor pieces and the dowel rods (thank goodness we’ve had unseasonably warm temps here, which made spray painting outside in November possible.
Next, we determined what the spacing between each set of hooks should be on the anchor pieces. We then marked the hook placement spots along the length of each anchor piece.
We lined up the two anchor pieces next to one another and attached the hooks, making sure that they were even across the two boards.
We played around with the anchor piece placement on the wall to determine how far up/down and left/right on the wall to place them. We used a dowel rod to determine the optimal spacing between anchor pieces (which ended up being 41″ apart).
We took into account of “jumbo size” gift wrap rolls, so that our gift wrap organizer would be able to accommodate these larger size rolls when we have them on hand.
Next, we drilled pilot holes in the anchor pieces (and into the wall) near the top and bottom of each board. We then screwed the anchor pieces into the wall at these four points, using wall anchors to hold them firmly in place.
Then came the moment of truth: placing a dowel rod and making sure that it’s level!
Now for the FUN part…decking it out with holiday-themed gift wrap to prep for the upcoming holiday gift wrapping tsunami that’s just around the corner.
SO EASY! And it turned out beautifully!
I’m loving the fact that this wall-mounted DIY gift wrap storage solution not only provides functional storage space, but it also offers an easy way to add fun punches of color to the room:
We considered several options for supporting the dowel rods, including oversized cup hooks and Command Hooks. Although the robe hooks were a bit more pricey, I’m super happy with them.
They are the perfect size for holding the rods, and they allow me to easily lift the rods and take them down when needed.
One more peek:
This project is something that a beginning DIYer can definitely tackle. But if DIY projects just aren’t your thing, check out this round-up of some of my other favorite gift wrap storage solutions, just in time for the holidays!
One Room Challenge Project Progress: Week 6
Here’s this week’s updated progress list:
Oh, and don’t forget to check out Calling it Home to see all 200+ incredible room makeover transformations this season spearheaded by both featured participants and guest participants in this season’s One Room Challenge.
See you back next week for the BIG REVEAL! 🙂
- Printables for Organizing Home & Life: The ULTIMATE Organizing Printables Vault! - November 28, 2023
- Clipboard Wall Organization for Papers: Easy DIY Paper Storage! - September 4, 2023
- How to Plan a Graduation Party to Remember: The Ultimate Graduation Party Planner - May 9, 2023
Janet Barclay says
This is brilliant! I have my rolls of wrapping paper standing in the back of a closet, but there is a risk of crumpling.
Natalie Gallagher says
Aw, thanks Janet! Yes, I agree that standing the rolls up in the corner of a closet is not ideal!
Donna @ Modern on Monticello says
This is a great idea and I might consider it for my own craft room. #HomeMattersParty
Natalie Gallagher says
Thanks Donna. I actually love to look at all that pretty wrapping paper displayed on the wall. It’s functional AND pretty!
Sarah @ The DIY Mommy says
I need this in my life! What a great idea!
Natalie Gallagher says
Aw, thanks Sarah!
Ann says
This is such a great way to organize wrapping paper! Thank you for sharing at Party In Your PJ’s.
Natalie Gallagher says
Thanks for stopping by Ann! Yes, this is one of my favorite DIY projects
Libbie says
This is such a great idea!!
Natalie Gallagher says
Thanks so much Libbie! I’m really digging it…
Shelly says
Brilliant and gorgeous!
Natalie Gallagher says
Awww, you’re too kind! I am loving it though!
tim@designmaze says
great idea!! I may have to try that with all my leftover wallpapers!
Natalie Gallagher says
It would definitely be a great solution for that as well!