You made it to the half-way point in The 10-Week Digital Photo Organizing Challenge…woot woot! This week we’ll be sorting digital photos.
If you are just discovering the Challenge, start by reading the Challenge overview, then begin to move through the weekly Challenge assignments:
- Week 1 – Establish Your Hub
- Week 2 – Inventory Your Collection
- Week 3 – Create a Backup System
- Week 4 – Create Your Core File Structure
Roll your sleeves up and get ready to dive into the tedious, but crucial step of sorting your images.

At this point in the game, you’ve got your main pictures folder in your digital photo hub that contains all of sub-folders of images from various sources (external hard drives, memory cards, smart phones, etc.). For the sake of simplicity, from this point on, I will refer to this folder as “The Chaos”.
Last week, you created your fresh, clean, and empty core file structure — the new framework for your organized photo collection. This week’s task is simple, but typically not easy. The task is to sort all images contained in “The Mess” folder into the appropriate folder with the new core file structure.
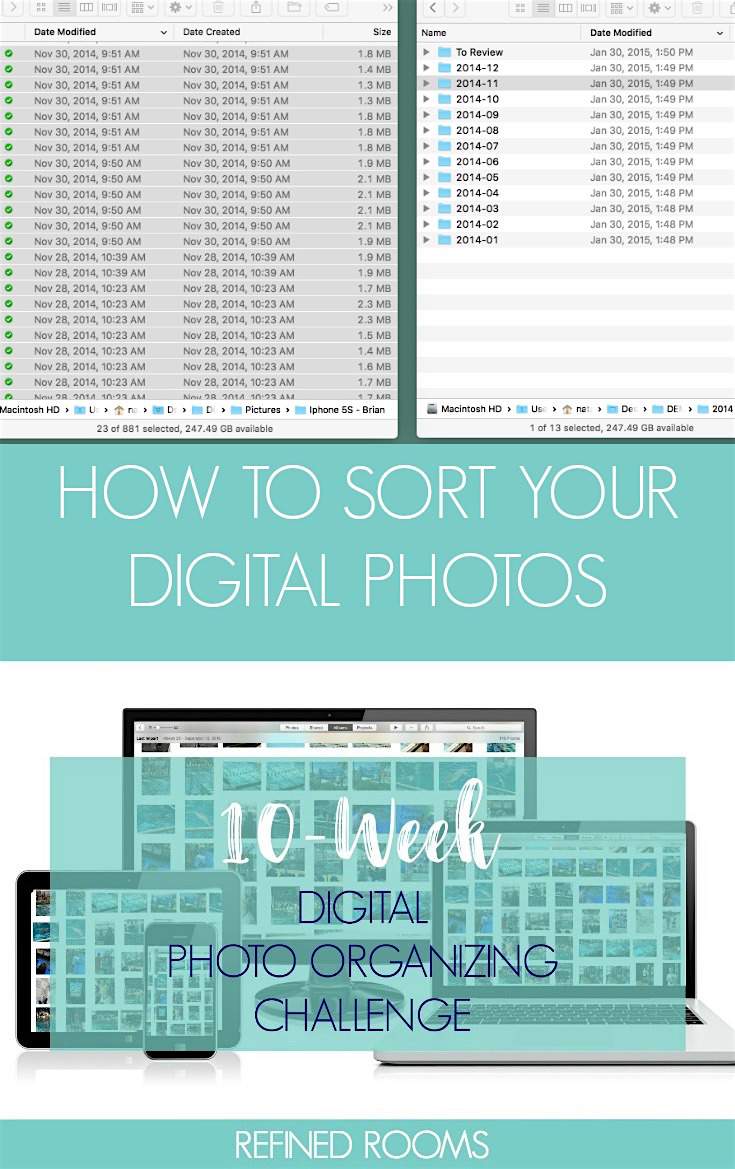
The method I recommend to accomplish this task is to open two windows side by side on your computer (this can be done on both a PC and a Mac). In the left window, open one of the source sub-folders within the”Chaos” folder and sort the images by date (date created, not date modified). Next, open a second window and drill down to the first month subfolder that you need. You can then cut/paste the images or drag and drop the images into the appropriate folder.
In the example below, I selected a set of images that were taken in November 2014 (see left window). Those images were then dragged into the 2014-11 folder of my core file structure (see right window).

As you complete the sorting task, you may come across images with dates that don’t make sense (e.g., the date is 3/1/1900, and you clearly did not take digital photos in the year 1900). For now, file these images in a “To Review” folder within one of your main year folders to review later in the process.
Take a closer look at how the sorting process works here:
SORTING DIGITAL PHOTOS: POTENTIAL CHALLENGES
The sorting step in the organizing process is a simple one, but not necessarily an easy one for two reasons.
First, you’ll likely have to dig through a series of nested folders within “The Chaos” to locate your image files. In the example above, you’ll notice the folders that contain a season’s worth of photos from a particular year. Drilling down into a set of nested folders takes time and focused concentration to keep yourself from inadvertently moving something to the wrong place or deleting files by accident (and hence the reason for backing up the “Chaos” in Week 3 of the Challenge.
The other reason it’s not easy is because it’s tedious work. Plain and simple. For that reason, don’t attempt to complete this step in one sitting. This is the type of task that needs to be broken down and spaced into multiple sessions. But once you begin to empty out those source sub-folders in “The Chaos”, it really does begin to get exciting!
Your Assignment for Week 5 – Sorting Digital Photos:
- Learn how to view two windows side-by=side on your computer (I included links to YouTube tutorials above to help you with this)
- Set aside time in your calendar this week for multiple sorting sessions
- Sort images by moving them from the Chaos folder into the appropriate folder within your new core file structure (sort by “date created”)
Be sure to return later in the week to let me know about your progress via the comments section, or Instagram (use hashtag #DPOChallenge on Instagram).
Have you grabbed your free Digital Photo Organizing Tool Kit yet? I’ve created it as a companion resource for Challenge participants. Just enter your information in the form below, and the Tool Kit will be sent straight to your inbox!
—————————————————-
This post is part of the 10-Week Digital Photo Organizing Challenge
Just stumbled upon the Challenge? You can work through all of the Challenge assignments here:
- Week 1: Establish your digital photo hub
- Week 2: Inventory your collection
- Week 3: Create a photo backup system
- Week 4: Create a core file structure for your digital photos
- Week 6: Remove duplicate digital photos
- Week 7: Rename digital photo file names
- Week 8: Tag & rate your digital photos
- Week 9: Create a digital photo organizing maintenance plan
- Week 10: Celebrate & share your photos
Photo © Deposit Photos@ Shtanzman
- Printables for Organizing Home & Life: The ULTIMATE Organizing Printables Vault! - November 28, 2023
- Clipboard Wall Organization for Papers: Easy DIY Paper Storage! - September 4, 2023
- How to Plan a Graduation Party to Remember: The Ultimate Graduation Party Planner - May 9, 2023

Kristin says
Thanks so much for your series! It’s very helpful, and I’m looking forward to completing the challenge. Have you ever used Lightroom? I totally understand the concern with using software to create a file structure that would be only proprietary, but from what I’ve seen in my research into the program, it looks like Lightroom could automate many of the tedious, time-consuming tasks of organizing digital photos (or at least make batch editing and renaming easier). IF that new file structure, along with tags and other metadata, is exportable back to the original core file structure, it seems to me that that would be the easiest route to take–in other words, switching to Lightroom perhaps between weeks 3 and 4, and then after completing the remaining tasks in Lightroom, exporting back or saving back all those changes to the core file structure (which I know does not happen automatically, but I think it can be done–that’s what I’m trying to confirm before I start using Lightroom).
What do you think? Should I try it? If I have to sort and rename everything manually I’m afraid I’ll never finish the project.
Natalie Gallagher says
Kristin — There are definitely alternative organizing methods you could choose and ultimately end up with the same end product. In my Challenge, my goal was to walk the average person through the process in a way that does not require them to invest in photo organizing software (either money or the time required to conquer the learning curve involved). Software such as Lightroom, Mylio, etc. can be used to expedite some of the tasks involved. But mastery of those programs involves a bit more tech savviness that some people feel comfortable with.
I invite you to experiment with incorporating Lightroom in the way you outlined and then report back here to let us know how it went. I’m particularly interested in the question about whether the metadata exports appropriately. You can always test a small batch of photos to determine that before importing your entire collection. Thanks for the great question!
Andi Willis says
I love how you have added a “To Review” folder to your file structure. It’s a great place to park those random pics until you are ready to deal with them. I’m really enjoying your series.
Natalie Gallagher says
Thanks Andi! Yes, it’s where I like to set aside those problem photos with wonky metadata until the end of the project. So glad you’re enjoying the series!