Welcome to Week 6 of the 10-Week Digital Photo Organizing Challenge! Today, we’re zooming in on a crucual step in the photo organizing process — deleting digital photo duplicates.
If you are just discovering the Challenge, start by reading the Challenge overview, then begin to move through the weekly Challenge assignments we’ve tackled so far:
- Week 1: Establish Your Hub
- Week 2 – Inventory Your Collection
- Week 3 – Create a Backup System
- Week 4 – Create Your Core File Structure
- Week 5 – Sort Images
So you’ve successfully sorted your images into their appropriate dated folder within your new core file structure. BRAVO! Now that that monumental task is behind you, things begin to get a bit more fun.
Yes! Photo organizing can actually be FUN 🙂
This week, we begin to “declutter” your images by deleting the digital photo duplicates within your collection.
As you can imagine, this step has the potential to be fairly time-consuming. Fortunately, there are some super helpful software tools out there to make the “de-duping” process go quickly. I use PhotoSweeper when working on a Mac (which I use to illustrate the de-duping process within this post). There are a few more options if you are using a PC. I’ve used Awesome Duplicate Photo Finder, when working on a PC. Other PC-based programs used by photo organizers include: Visipics, PhotoSort, and Duplicate Cleaner Pro.
Take some time to explore the various software programs and determine which one you feel most comfortable with (features, user interface, price, etc.). Once you make a selection, your first order of business is to download the software and begin to play around with it. I highly suggest creating a “practice folder” of copied images that you can use to complete a series of de-duping runs in order to get a good feel for how the software program works. You can also search for tutorials on YouTube in order to fully explore the software features.
DIGITAL PHOTO DUPLICATES: DE-DUPING TIPS
CREATE A BACKUP BEFORE BEGINNING THE DE-DUPING PROCESS
Once you are in the thick of the de-duping process, you may encounter a moment of terror as you discover that you’ve inadvertently deleted photos that you didn’t want to delete. If you created a back-up copy of your original core file structure before you began the de-duping process, you’ll be able to restore those accidentally deleted photos and begin to breathe again!
REMOVE NON-IMAGE FILES FROM YOUR CORE FILE STRUCTURE BEFORE DE-DUPING
I don’t think I mentioned this in previous posts, so I’ll do it now. The only type of files that should exist at this point in your core file structure are image files (.jpg, .tif, .png, .gif). If you run the de-duping software on folders that contain other types of files, it has the potential to trip up the software.
RUN SEPARATE DUPLICATE SEARCHES FOR EACH YEARLY FOLDER
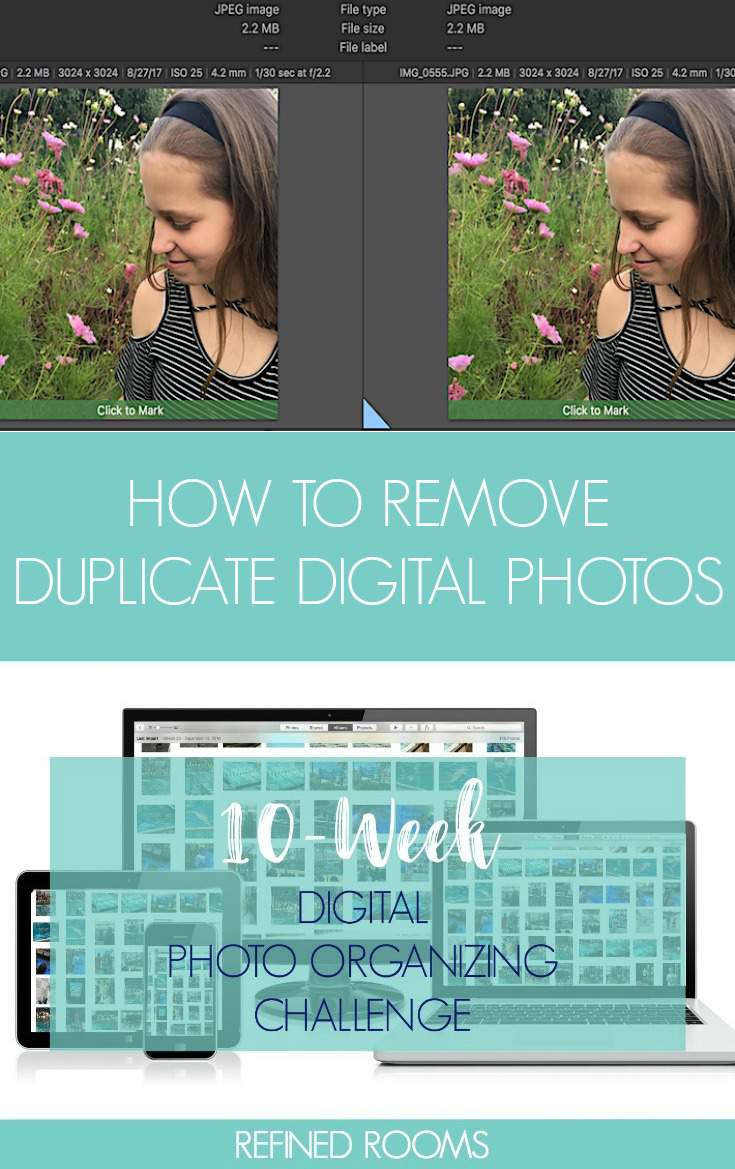
In order to avoid overwhelming the software and yourself, I recommend first running duplicate searches separately for each yearly folder within your core file structure. In the example below, I ran a search on my 2017 file folder, which contains 1501 images (so far).

After the search is completed, my task is to visually compare 24 images and make decisions about what can be deleted. That’s do-able!
After you’ve gone through the process of looking at 100% duplicate match images within the year folder, repeat the process a few more times, adjusting the criteria of similarity. Most duplicate finder software programs allow you to dial in or out the criteria for defining a match. Play with it a bit to see what results pan out.
Take a peek at all the search possibilities in Photo Sweeper
DELETE IMAGES THAT HAVE A 100% MATCH
Since it makes no sense to keep 2 identical images in your collection, deleting the ones that have a 100% degree of similarity is really a no-brainer and doesn’t require any taxing decision-making on your part.
You can choose to move your deleted images directly into the trash, or move them to a “To Be Deleted” folder (if you prefer to place them in a holding area and delete everything at the end of the photo organizing project).
WHEN CHOOSING BETWEEN SIMILAR IMAGES, CHOOSE THE ONE WITH THE LARGER FILE SIZE
As you work your way down the list of images, you’ll likely come across ones that are not 100% matches, but are similar enough that you’re willing to part with one of them. Whenever possible, keep the image with the larger file size and let go of the other one. The larger the file size, typically the higher the photo quality/resolution.
In the case below, I kept the image on the left, since the file size was larger
BE RUTHLESS IN YOUR PHOTO DECLUTTERING EFFORTS
Just because two images are rated with a low degree of similarity, doesn’t mean that you are obligated to keep both photos. We often have many images that are taken in quick succession that capture essentially the same moment. Your job during the decluttering process is to make some tough choices to keep your image collection lean and mean.
When I came across this comparison, I asked myself “do I really need both of these images?” Nope. I chose the one that I thought was the best (in this case, the one on the right, since my son was actually smiling ever-so-slightly!).
RUN YOUR CORE FILE STRUCTURE THROUGH THE DE-DUPING PROCESS AFTER YOU’VE COMPLETED RUNS ON THE YEARLY FOLDERS
Once I’ve completed the above-outlined de-duping process on each of the individual yearly folders, I then run my the master pictures folder (containing the entire core file structure) through the software program one last time. In theory, duplicates/similar pictures should be grouped together within a yearly folder, but conducting this one final run-through gives me peace of mind that I didn’t miss anything.
Your Assignment for Week 6 – Deleting Digital Photo Duplicates:
- Research de-duping software programs and choose one to use for identifying duplicates in your collection
- Be certain that you’ve created a backup copy of your digital photo hug folder BEFORE beginning the de-duping process
- Conduct a few trials runs with the de-duping software (using copies of some of your picture folders) until you become comfortable with using the software
- Run each of your yearly picture folders through the de-duping software (one at a time), using the tips outlined above to help you decide which images to keep and which ones to discard
- Run your entire core file structure (master pictures file folder) through the de-duping software.
Be sure to return later in the week to let me know about your progress in the comments or on Instagram (use hashtag #DPOChallenge).
Have you grabbed your free Digital Photo Organizing Tool Kit yet?
I’ve created it as a companion resource for Challenge participants. Just enter your information in the form below, and the Tool Kit will be sent straight to your inbox!
—————————————————-
This post is part of the 10-Week Digital Photo Organizing Challenge
Just stumbled upon the Challenge? You can work through all of the Challenge assignments here:
- Week 1: Establish your digital photo hub
- Week 2: Inventory your collection
- Week 3: Create a photo backup system
- Week 4: Create a core file structure for your digital photos
- Week 5: Sort digital photos
- Week 7: Rename digital photo file names
- Week 8: Tag & rate your digital photos
- Week 9: Create a digital photo organizing maintenance plan
- Week 10: Celebrate & share your photos
~ Happy Photo Organizing my Friends!
Photo © Deposit Photos@ Shtanzman
- Printables for Organizing Home & Life: The ULTIMATE Organizing Printables Vault! - November 28, 2023
- Clipboard Wall Organization for Papers: Easy DIY Paper Storage! - September 4, 2023
- How to Plan a Graduation Party to Remember: The Ultimate Graduation Party Planner - May 9, 2023
Kadi Gonzalez says
I’m working through week 1. I have SO many photos and multiple duplicates from an old external hard drive. Can I do this step before sorting just to help weed through some? It’s slowing my computer down even with the external hard drive as my photo hub
Natalie Gallagher says
Kadi,
You could do the de-duping first, but I find that running a massive amount of photos at one time through the de-duping software can be very overwhelming. It’s a much more manageable process if you do it by monthly subfolder and that’s why I have the steps in the order that they are in the Challenge.
Autumn Leopold says
I’m starting from week one! 🙂 Thanks for the series Natalie!
Natalie Gallagher says
Awesome Autumn! Keep me posted on your progress and let me know how many digital images are in your collection when you start…I’m curious!
Janet Barclay says
I haven’t been able to work through the weekly steps, but this information is SO valuable! I will definitely be coming back when I’m ready to work on my collection.
Natalie Gallagher says
The Challenge series will be here when you are ready Janet!